Inking & annotating screenshots with a Chromebook
Inking – writing on top of an image, otherwise known as annotating is possible using a Chromebook. Our amazing Lan-Tech, Bailey has put together this “How-to” slideshow to assist teachers who want to use it, or who have used it in the past but now can’t find it.
This is a pretty handy skill to have for teaching in GSuite.

Kami – Some Good Fall 2019 Updates

The wonder of cloud software is that when they update the application, all users benefit immediately.
All teachers and students in CESD are provided with a full license to Kami. If you do not see the purple circle with the letter K in the upper portion of your screen, click here to install it!
Kami is a fantastic annotation tool for teachers to use during instruction. It is, additionally a wonderful piece of assistive technology for students who struggle with various disabilities that negatively impact their output and ability to show their comprehension of the content being taught.
Documents in .pdf form are ideal for Kami. If you wish for Kami to be able to read the content to your students (it does, indeed, have this capacity), your .pdf will have to be scanned using OCR (Optical Character Recognition) as that is what turns the digital version into actual letters as opposed to the “dots” of a photocopy-type scan. There are heaps of applications for smartphones that offer OCR. Snapverter is one of these applications. Made by the same company that makes Read & Write, Snapverter can be installed on your phone and in a matter of seconds you can have an OCR-scanned document for your students who struggle. It’s literally that easy.
The Kami toolbar has seen some changes this fall. These changes are in response to user feedback, so don’t ever make the mistake of thinking giving ed tech companies is a waste of time; it absolutely is not! You presently have the choice between the new or the old toolbar, so if you want to test out the new toolbar (if you’re new to Kami, you should just go right to the new toolbar so you aren’t learning the old one only to have to do a second run at learning when they discontinue the old one!) We will tackle how to enable the new toolbar in a moment. First let’s look at WHAT Kami even offers.
Reading and manipulation tools
At the heart of Kami is the ability to close read and move through files. To do this we have:
- Select tool: Your basic mouse tool allows you to interact with the file without creating annotations. You can also use it to copy and paste.
- Hand tool: Expressly for navigating the file, the hand tool enables easy scrolling.
- Text to speech: This tool has two modes. Simply clicking it will read the whole file out loud from the beginning. Alternatively, you can highlight the text selection that you wish to hear. For added fun try changing the accent!
- Dictionary: This tool allows you to select a word that you would like to see defined.
Markup tools
To annotate, highlight or otherwise edit your file you can use our selection of markup tools:
- Highlight: This tool allows you to highlight text throughout a file. You can also free draw with the Highlight Tool by selecting the ‘Box Highlighter’ option.
- Comment: This tool can be used to select a section of text and then make associated comments within the automatically created annotation box. Comments or annotations can be made through the keyboard, via voice typing (where spoken words are translated into text on the page), audio or video.
- Text box: This tool allows you to place text boxes anywhere in their document, perfect for filling in forms. Both the color and size of the text can be adjusted as needed.
- Equation: This tool allows you to create equations by using the symbols palette (click the pi symbol to see the full selection).
- Strikethrough: The Strikethrough Tool allows you to cross out text. This is most useful for those editing or proofreading a document.
- Underline: The underline tool can be used to help emphasize a point or draw attention to the area.
Creativity tools
To add some color and fun to your file you can try:
- Drawing: This tool allows for freehand drawings to be made anywhere on the file. The stroke thickness and transparency can be adjusted, as can color. The tool can be adapted to create perfectly straight lines by holding shift before drawing.
- Shapes: This tool allows you to place shapes on your PDF. You can create circles, squares, and lines in any colour and to whatever size.
- Eraser: The eraser tool removes shapes, text, signatures, and drawings that have been made onto your PDF. To use the eraser tool, simply click and drag over the annotation that you wish to remove.
Features for inserting media
Lastly, you can insert a range of media into your Kami file:
- Insert image: Using this tool you can insert an image from a variety of locations: your own documents, Google Drive, Google safe search or a webcam photo.
- Insert signature: This is used to upload and store your signature to sign PDF files quickly. You can upload an image of your signature, draw it into the file or even draw on your phone – whichever method works best to get the highest quality version.
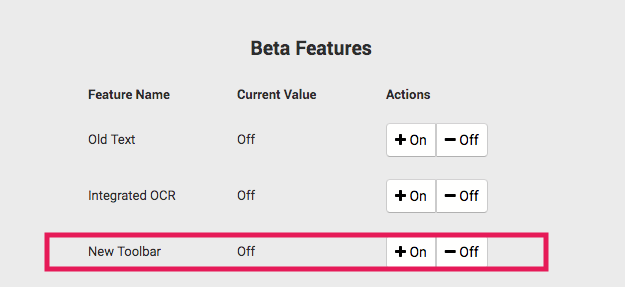
So, to access the new Toolbar, do the following:
- Head to settings (by clicking on your account name at the very top right corner),
- Scroll all the way to the “Beta Features” section right at the bottom,
- Find the line that says “New Toolbar” and select “On”.
- Refresh your page.

If you need to go back to the old toolbar you can turn it back off there, but please let the folks at Kami know why you went back to the old one (do so by emailing their support as eventually they will fully migrate to the new layout. Email address is support@kamiapp.com.)
Much of the content posted here comes directly from Kami’s own blog – it’s super awesome, and you should check it out ASAP!

CESD Kami Handbook
As questions arise regarding Kami, I have begun to assemble some of the ins-and-outs into a Printable “handbook” that includes screenshots to try to assist. The handbook will be updated as new questions arise, but will only be as lengthy as the questions posed within CESD.
The handbook has been created in Google Slides…. so here’s a tip you may have forgotten – – when you build printables in Google Slides, you can change the size of the “slide” to be 8.5 X 11 (file -> page setup -> custom size) and voilà! You can easily create a booklet or any other printable, with a thumbnail view on the left side of your workspace! So, if you were a Publisher user, this is a quick way to regain some of the control of your layout!
