Bandwidth – Maximizing and Troubleshooting

Bandwidth – Maximizing and Troubleshooting
As we move toward a week of at-home learning for all students in Alberta at the start of January 2021, we are offering this tutorial to try to help families maximize the capacity of their home internet connection without incurring additional costs to the internet service providers. There are many things that can be done for free to try to improve the Google Meet experience.

This video will give an analogy for the internet and bandwidth and then take you through some ideas to improve your home connection.

Summary

  • Move closer to your router. Try to attain 3 bars.
  • Do a speed test of your download & upload speeds.
  • When possible, download content the night before it is needed (especially video content).
  • Enable offline mode for GSuite (Google Docs, Slides, Sheets).
  • Powercycle your router.
  • Set Google Meet’s layout to “spotlight” (and don’t use blur/change background).
  • Remove household cell phones from the wifi, or turn them off.


Glitches in Google Meet

Glitches in Google Meet

If you are experiencing challenges with either of these Google Meet glitches, this blog post will offer the solution.

1. The link that Google Classroom generates is glitchy. We have learned from our remote learning troubleshooting this fall that using the Meet link that Classroom publishes on the banner does not always ensure that the teacher is the owner of the session.


We realized these links were glitchy when we had one of our remote teachers log in to her own Meet first (ahead of all students) – 8:50 am according to the Google server log. At 8:58 her first student logged in, and that student was in control of the meet.

2. A Meet address that you have created seems to have expired. This seems to occur when the meet is given a nickname. 


To Solve These Issues

1. Go to meet.google.com and click on “Join or start a meeting”.

2. Do NOT give the Meet a nickname.

3. Copy the URL (web address) that Meet generates.

4. Paste the URL into Google Classroom as a material and apply a topic to it (I’d call the Topic “Google Meet Link”) and then drag that topic to the very top of your classwork tab in Google Classroom.

If at any time your Meet link begins to glitch (Michelle has used the same link since the first Covid quarantine in March of this year), repeat the above steps, but you’ll only need to edit the material in step 4.  You might also consider pasting your Meet link onto your staff bio page on your school’s website. Michelle has pasted hers onto her CESD staff bio if you ever need it!

Other Challenges

When things have glitches, it is often “the network” we first blame for the problems. If you are physically in a CESD school, it is highly unlikely to be the network. However, what students have open on their device can present challenges.

If students have a large number of tabs open, this can place a burden on their device, causing Meet to not have access to the local resources it needs to run. This can cause a student to be “booted” out of the meet, or can cause their video to be glitchy.

If students are at home on a PC or Mac computer, other programs they have open can steal valuable processing from that computer. Things like Fortnite running in the background, or YouTube open to play music while they listen can be quite problematic in Google Meet.

Students accessing the meet on a mobile device (smartphone or tablet) not using the actual app for Google Meet may experience challenges.

Lastly, the network in the personal space (homes) of the participants can have an impact on the meeting. The CESD network is unlikely to be at fault, but home networks may be.


Upgrading Your Chromebook

Upgrading Your Chromebook

If you are experiencing challenges with your Chromebook, or a student Chromebook, the first place to start is to engage in the simple process of updating the operating system. This step-by-step guide will walk you through the steps to ensure that your operating system is current, which will minimize glitchy behaviours of the machine.

Quick Fixes

Quick Fixes

When stuff happens on a Chromebook, how do you fix it? Here are a few of the more common challenges.

How do I take a screenshot on a Chromebook?

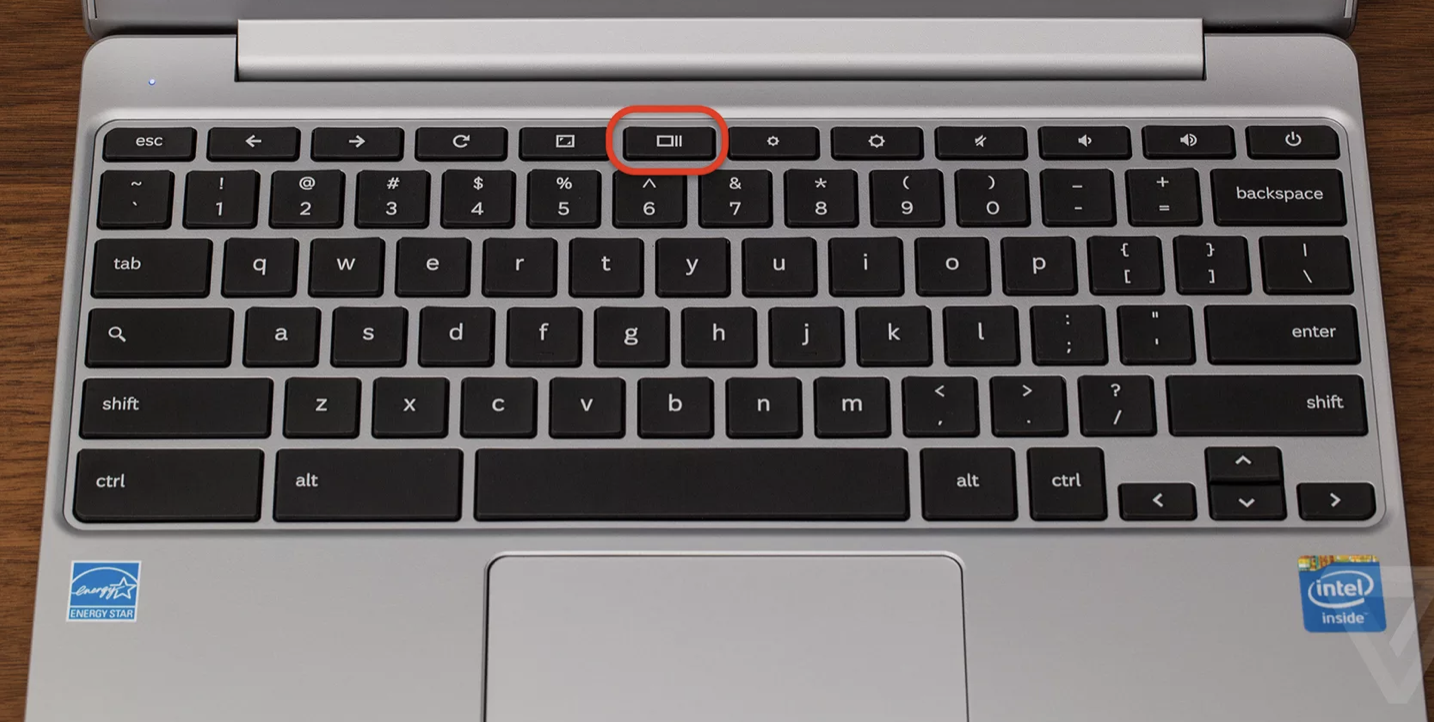
Taking a screenshot on a chromebook is easy. Depending if you want a full screen image, or just a portion of the screen, you will use one of two key sequences to accomplish the task.  To understand the two sequences, this image illustrates which button is the “Show windows” button.

To take a full screen grab, press “Ctrl” and the “Show Windows” key together.

To take a screenshot of only a portion of your screen, press “Ctrl”, “Shift” and “Show Windows” Together.

How do I add Extensions to Chrome?

Visit the Chrome Webstore. You can search by need (e.g. photo editing) or by extension name (e.g. Kami).

How do I remove an Extension from my Chrome?

Launch Google Chrome, and follow these steps.

  1. Open the Google Chrome browser.
  2. Click the Customize and control Google Chrome Chrome menu icon. icon in the upper-right corner of the browser window.
  3. In the drop-down menu that appears, select More tools, and then Extensions.
  4. In the Extensions tab, find the extension that you want to disable or remove.
  5. To disable the extension, click the toggle switch at the bottom-right of the extension box so that it turns gray. To remove it, click the Remove button.
My Screen is turned!

Simply hit ctrl+shift+refresh. The refresh key is the one with the spinning arrow. It’ll rotate the screen. Repeat as many times as needed.

There is a keyboard on my screen...

…and it won’t go away! This quick video will assist you with getting rid of it!

My chromebook is Running so slowly!

You likely need to empty your “downloads” folder. Chromebooks are not built with a large hard drive inside the machine. There’s enough space for a few things to be held temporarily, which means that you should load the downloaded content into your Google Drive, then DELETE it from the downloads folder.

I created a Shared (Team) Drive, but I’m leaving…

The shared drive will remain in place, and all other persons with access to the drive will continue to have access to all content, including the content you created and/or contributed.

But what if there is no one else in the Shared Drive from CESD?

The shared drive will continue to exist. So, if you collaborate with people in other districts via shared drive, they will indeed continue to have access to the content exactly as if they were internal to CESD.

How do I make Flash work?

Flash is an outdated, slow internet mechanism that is being discontinued on December 31, 2020. The majority of websites (PhET Simulations for example) have been preparing for this eventuality for many years. Their simulations are basically all converted (I haven’t found one recently that wasn’t converted, but I won’t claim they are ALL converted.  Learn Alberta is another challenge; many things are html5 compliant, but some are not. The loss of flash is not a new piece of information to those sites, they’ve had YEARS (literally) with the knowledge that flash was going the way of the dodo in 2020.  If something you’ve used in the classroom has not been converted, there could be many reasons for this. Rather than beating your head against the wall because it’s gone, it’s probably worth your time to find something newer to replace it with.


I Downloaded Something and Don't Know Where it is!

Swipe up from the bottom of your Chromebook so that all installed applications appear. You are looking for a circular blue icon with a white file folder called “Files”. If you open this up, you will see your downloads and your Google Drive. Drag the item from the downloads over to your Google Drive, then delete it from “Files” to prevent your Chromebook slowing down.

I've Been Added to Too Many Shared Drives (Team Drives)

If someone has added you to a Team Drive (renamed to Shared Drive in summer 2019) and you are feeling as though there are too many shared drives, you can hide ones you rarely use from your view (you can make them visible again later if you change your mind).

  1. On the left side of your screen expand your Shared Drives view.
  2. Right click on the name of the Shared Drive you no longer wish to see.
  3. Choose “Hide from View”.


How Can I Determine if a File has Been Shared?

Shared files will have a grey image of two heads beside them which indicates that you are not the only person who can see the file. If the two heads are absent, your file is private to you only.

I Don't Want People in the Shared (Team) Drive to Edit My Document!

In terms of permission settings, the shared drive permissions will trump the document permissions. An example of this could be the following:

A Principal sets up a shared drive for staff meeting documents and adds all staff as “Content Managers” meaning they can edit (add items to the agenda for instance) documents and add items into the shared drive. 

But… when said principal puts in a document into this drive that are not to be edited, the drive setting override. For these documents, a second shared drive may be warranted.